


Trading the Inside Bar Pattern for Smarter Trades

An inside bar pattern is a simple, two-bar price action setup. It points to a brief pause or consolidation in the market, and it's a huge clue that a potential breakout might be just around the corner.
Decoding the Market Pause: What Is an Inside Bar Pattern?
So, what are we actually looking at? The pattern is defined by a small candle, the inside bar, whose entire trading range—from its high to its low—is tucked completely inside the range of the candle right before it. We call that bigger, preceding candle the mother bar.
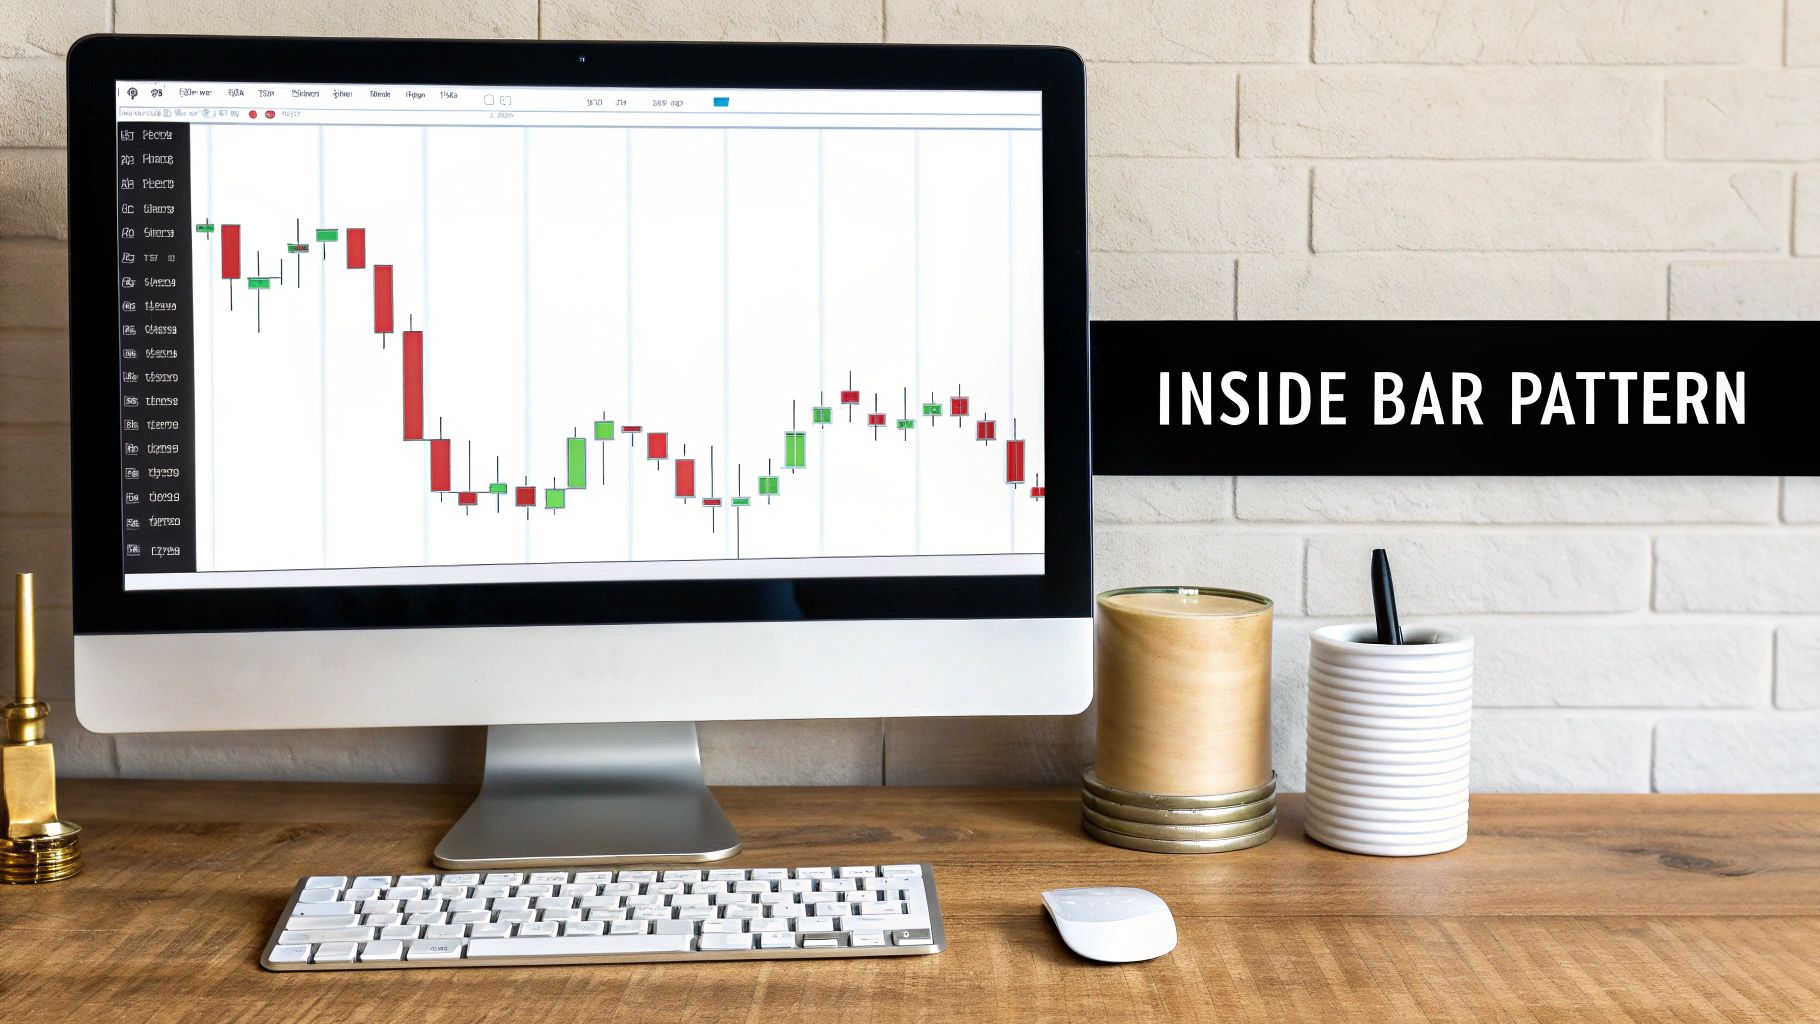
Picture a fierce tug-of-war between the bulls and bears. The mother bar shows a powerful pull in one direction, setting a wide trading range for that session. Then, the next candle—the inside bar—is much smaller and can't manage to push outside that range. It’s a classic visual of indecision.
The market is essentially taking a breath. After a big move, neither buyers nor sellers have the momentum to push the price beyond the previous candle's high or low. This short consolidation acts like a coiled spring, building up tension for whatever comes next.
This pattern is a cornerstone of how to trade using price action, a clean approach focused on reading market behavior directly from the chart without a mess of indicators.
The Two Core Components
The beauty of the inside bar is its simplicity. It's just two key pieces, and understanding their roles is your first step to mastering this setup.
- The Mother Bar: This is the first, larger candle. Think of it as setting the immediate boundaries—the short-term support and resistance. Its high and low define the sandbox the market is playing in for the moment.
- The Inside Bar: This is the second, smaller candle. Its defining trait is that its high is lower than the mother bar's high, and its low is higher than the mother bar's low. It's completely swallowed by the candle before it.
When this second bar forms, it's a clear signal that volatility has dropped off. The market's momentum has hit a temporary wall, creating a window of opportunity for sharp traders.
An inside bar pattern represents a period of consolidation after a significant market move. It’s a visual cue that the market is pausing to decide on its next directional bias, often leading to a strong breakout.
Why This Pattern Matters
The inside bar isn't just another random shape on your chart; it’s a peek into market psychology. It shows us a temporary standoff between buying and selling pressure, which is an inherently unstable situation. A breakout from this tight squeeze is almost inevitable.
For us traders, this gives a fantastic framework for managing risk. The high and low of the mother bar serve as logical, clear-cut points for placing entry orders and stop-losses. This naturally creates trade setups with a very favorable risk-to-reward profile.
Context is everything. An inside bar can signal either a continuation of the current trend or a major reversal. A pattern popping up at a key demand zone tells a completely different story from one forming in the middle of a choppy, directionless market. This versatility is what makes it such a vital tool for any price action trader, no matter if you're trading stocks, forex, or crypto.
How to Accurately Identify an Inside Bar
Spotting an inside bar pattern on your chart is one thing, but knowing how to trade it with confidence comes from understanding its nuances. At its heart, the pattern is simple: you’re looking for a two-candle formation where the second candle is completely swallowed by the first.
Think of it as a brief pause in the action—the market is just catching its breath.

The first candle, what we call the mother bar, sets the immediate trading range with its high and low points. The very next candle, the inside bar, must have a high that’s lower than the mother bar's high and a low that’s higher than the mother bar’s low. This rule is absolute—it’s the foundation of the entire pattern.
If you're new to this, getting a grip on candle anatomy is a must. Our guide on understanding candlesticks charts will give you a solid footing before you dive deeper into specific patterns like this one.
The Anatomy of a Valid Inside Bar
To avoid the common mistakes traders make, let's break down the visual checklist. A real inside bar setup isn't just any small candle after a big one; it's a very specific relationship between their price ranges. The pattern signals a temporary equilibrium, a tightening of volatility that often coils up before a significant move.
To confirm you've found a genuine inside bar pattern, you need to see these precise criteria:
- A Clear Mother Bar: First, you have to identify a distinct mother bar. This is usually a candle with a decent-sized body and wicks, which establishes a clear high and low.
- Complete Engulfment: The entire range of the inside bar—from the very top of its upper wick to the bottom of its lower wick—has to be contained within the mother bar's range.
- No Touching: The high of the inside bar can't touch or pop above the mother bar's high. And its low can't touch or dip below the mother bar's low.
This strict definition is what separates a true moment of market consolidation from just random price noise.
The most powerful inside bar patterns show up after a strong, directional move. This context tells you the pause is a genuine consolidation before the next leg of the trend, not just meaningless chop.
To help you internalize this, I've put together a quick checklist. Run through these points every time you think you've spotted an inside bar to make sure it's a valid, high-quality setup.
Inside Bar Pattern Identification Checklist
| Checklist Item | Criteria | Why It Matters |
|---|---|---|
| Two-Candle Formation | A mother bar followed immediately by an inside bar. | This is the basic structure of the pattern. No more, no less. |
| Inside Bar High | The inside bar's high is lower than the mother bar's high. | Confirms the upper boundary of the consolidation range is holding. |
| Inside Bar Low | The inside bar's low is higher than the mother bar's low. | Confirms the lower boundary of the consolidation range is holding. |
| Contained Range | The entire inside bar (wicks included) is inside the mother bar's range. | This visualizes the sharp drop in volatility and coiling price action. |
| Market Context | Forms during a clear trend or at a key technical level. | The pattern's location is more important than the pattern itself. |
Using this table as a quick reference can stop you from jumping into weak or invalid setups. It forces you to be disciplined and only consider the patterns that truly matter.
Variations and Market Context
Now, not all inside bars are created equal. You’ll sometimes run into variations that signal an even bigger potential breakout. A common one is the multiple inside bar formation, where you get two or more inside bars in a row, all tucked within the range of a single mother bar. This shows an extreme compression of price and indecision, often leading to an explosive move when it finally breaks.
But context is king. It's the most critical filter for finding high-probability trades. An inside bar that forms in the middle of a choppy, sideways market means very little. One that forms at a key technical level? That's a different story entirely.
Always ask yourself: where is this pattern forming?
- Is it resting on a major support or resistance level?
- Is it popping up after a rejection from a supply or demand zone?
- Does it align with the dominant trend on a higher timeframe?
When an inside bar appears at a point of confluence like this, it acts as a powerful confirmation signal. It’s telling you a story: the market has paused to absorb orders at a critical price point before making its next decision. Learning to read this bigger market narrative is what separates amateur pattern-spotters from professional price action traders.
Actionable Trading Strategies for Inside Bars
Spotting an inside bar is one thing, but knowing how to trade it is where the magic happens. Turning that simple observation into a concrete, executable plan is the real skill. The pattern gives us two main paths to follow: trading a breakout to ride the trend or catching a reversal when the market runs out of steam.
We'll break down both approaches, focusing on building a complete trading system. That means clear rules for entry, stop-loss, and profit targets. The goal is to get rid of guesswork and trade with the kind of discipline that builds a long-term career.
Strategy 1: The Breakout Continuation
By far, the most common way to trade an inside bar is as a trend continuation signal. Think of it as a quick breather. The market has been moving hard in one direction, it pauses to consolidate energy, and then it’s likely to blast off again on its original path.
This strategy is so powerful because you're swimming with the current, not against it. You're aligning your trade with the existing market momentum. When an inside bar pops up after a strong, decisive move, the odds of a breakout in that same direction are much, much higher.
Here’s the step-by-step game plan:
- Find the Dominant Trend: First things first, you need a clear trend. Look for a series of higher highs and higher lows for an uptrend, or lower highs and lower lows for a downtrend.
- Spot the Inside Bar: Now, just wait for an inside bar pattern to form right in the middle of that established trend.
- Set Your Entry Order: Place a buy-stop order a few pips above the mother bar's high in an uptrend. For a downtrend, you'll set a sell-stop order a few pips below the mother bar's low.
This methodical approach keeps you from jumping the gun. You only enter once the price proves it wants to continue the trend by breaking out.
Key Takeaway: The breakout strategy is all about alignment. You're using the inside bar as a low-risk entry to join the primary momentum. Never fight the trend.
Strategy 2: The Reversal at Key Levels
While continuation trades are the bread and butter, an inside bar can also flag a massive market reversal. This strategy, however, demands a lot more precision and context. A reversal inside bar doesn't just show up anywhere; it forms at a major turning point.
Imagine a train speeding toward a solid brick wall. As it gets closer, it starts to slow down, losing steam before it hits the wall and is forced to change direction. The inside bar is that moment of deceleration right before the reversal. These "brick walls" on your chart are your key support and resistance levels—or, as I prefer, major supply and demand zones.
To pull this off, you need to:
- Pinpoint Significant Levels: Find major, historically proven support or resistance areas, preferably on a higher timeframe.
- Watch the Price Action: See how the price behaves as it approaches this level. You want to see the momentum fizzle out.
- Wait for the Signal: An inside bar forming right on that key level is your signal. It's the market telling you the dominant force (buyers in an uptrend or sellers in a downtrend) just failed to break through a critical barrier.
The entry for a reversal is similar to a breakout, just in the opposite direction of the last move. If you see an inside bar at a major resistance level, you’d place a sell-stop order below the mother bar's low, anticipating a sharp move down.
Defining Your Risk and Reward
A trading signal without a rock-solid risk management plan is totally worthless. Luckily, the inside bar pattern gives us a beautifully simple framework for this.
Setting Your Stop-Loss
The placement is logical and crystal clear. For any inside bar trade, your stop-loss goes on the opposite side of the mother bar.
- For a long (buy) trade, place your stop-loss just below the low of the mother bar.
- For a short (sell) trade, place your stop-loss just above the high of the mother bar.
This protects you if the pattern fails immediately. It defines the exact point where your trade idea is proven wrong, giving the trade just enough room to breathe without risking too much capital.
Setting Profit Targets
Your profit targets should always be based on the market's structure. Look left on your chart and find the next logical obstacle the price will run into. This might be the next major support or resistance level, a pivot point, or a significant supply zone.
I always aim for a risk-to-reward ratio of at least 1:2. That means your potential profit is at least double your potential loss. This is critical because it ensures your strategy can be profitable over the long run, even if you don't win every single trade.
Using Confluence to Confirm Your Trades
Seeing an inside bar pattern pop up on your chart is a great heads-up. It's a clear signal the market is pausing, coiling up before its next big move.
But here’s the thing about trading: relying on a single signal is like trying to navigate the ocean with just a compass. It’s a start, but it's incredibly risky. To build truly robust, high-probability trade setups, you need to look for confluence.
Confluence is just a trader's way of saying multiple, independent reasons are all pointing to the same conclusion. Think of it like a detective case where three different witnesses, who don't know each other, all tell the exact same story. When your inside bar pattern is backed up by other technical evidence, your confidence in the trade should skyrocket. This is how you filter out the weak signals and focus your capital on the A+ setups.
So, instead of jumping on every inside bar you see, you learn to wait. You wait for the ones that form at the most critical points on the chart. These are the patterns with layers of technical significance behind them, turning a decent trade idea into a great one.
Layering Technical Signals for Stronger Setups
The first and most powerful layer of confluence comes from simple market structure. An inside bar that forms right at a major support or resistance level is a world away from one just floating in the middle of a price range. These levels are the battlegrounds where bulls and bears are duking it out for control. A pause in the action right here? That’s significant.
Imagine a long, powerful uptrend that finally stalls out at a major resistance zone and prints an inside bar. This isn't just a pause; it’s a potential sign of exhaustion. The buyers, who were in total control, just failed to break through a wall that has historically stopped price in its tracks. You can learn more about finding these critical areas in our guide on resistance and support in stocks.
Here are some of my favorite tools to combine with the inside bar pattern:
- Moving Averages: During a solid uptrend, an inside bar that forms and finds support right on a key moving average (like the 21 EMA or 50 MA) is a classic continuation signal. It tells you the trend is still healthy, and this is likely just a quick breather before the next leg up.
- Supply and Demand Zones: These zones are the real engine of the market. An inside bar appearing at the edge of a fresh demand zone is a huge clue that buyers are about to step back in, giving you powerful confirmation for a long trade.
- Trendlines: When price pulls back to a long-standing, respected trendline and forms an inside bar right on it, that trendline is acting as dynamic support. This alignment adds serious weight to a potential breakout trade in the direction of the trend.
- Volume Analysis: A high-quality inside bar often forms on lower volume than the mother bar. This shows a genuine drop-off in market activity—the perfect quiet before the storm.
Reading the Broader Market Context
Confluence isn't just about lining up a few indicators on your chart; it's about understanding the big picture. Is the market in a strong, trending environment, or is it stuck in a choppy, sideways mess? An inside bar is far more reliable when there's clear directional momentum. Trying to trade inside bar breakouts in a range-bound market is a fast way to get whipsawed by false moves.
The pattern's statistical rarity also gives it weight. A deep-dive study on the SPY ETF found that inside bars only occurred on 22% of trading days. This scarcity means that when one does show up, it's worth paying close attention.
The same study found that when an inside bar did form, the market broke out of the mother bar’s range 77.78% of the time. That's a powerful edge.
This decision tree gives you a simple mental checklist for approaching an inside bar setup.
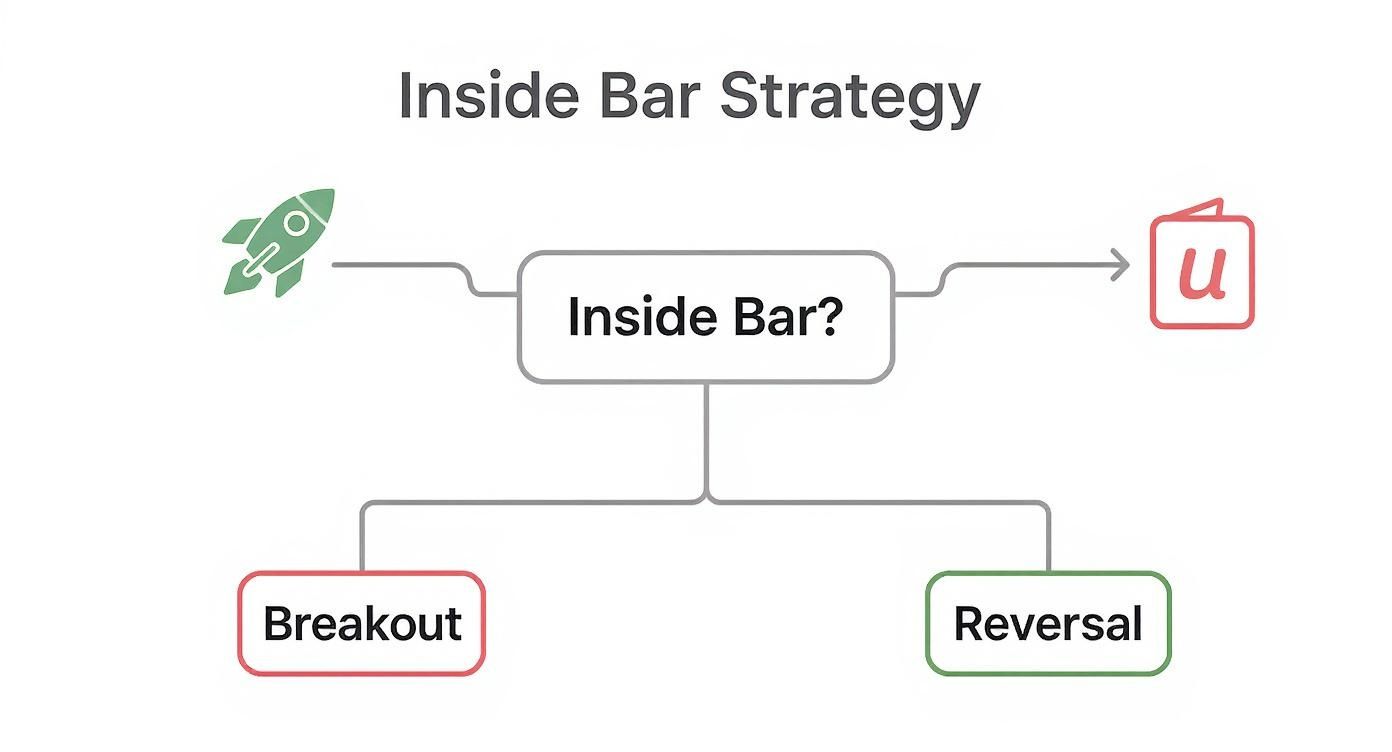
This visual helps boil your strategy down to its core questions: is the pattern signaling a continuation breakout, or is it a potential reversal at a key level?
By layering these confirming factors, you stop being a pattern-spotter and start becoming a trader who builds a complete thesis. Each additional piece of evidence stacks the odds a little more in your favor.
A trader's job is not to predict the future but to find scenarios where the probability of one outcome is significantly higher than another. Confluence is the tool that helps you identify those high-probability moments.
Ultimately, using confluence transforms the inside bar from a simple two-candle pattern into a powerful piece of a much larger market puzzle.
Real-World Chart Examples and Breakdowns
Theory is one thing, but seeing the inside bar pattern play out on a live chart is where the rubber really meets the road. It’s time to move beyond the textbook diagrams and dig into some real-world trade setups.
We’ll look at both winning trades and, just as importantly, instructive failures. I’ve often found that learning from a pattern that doesn't work out teaches you more about market context than a dozen perfect trades ever could.

Think of the following examples as mini case studies. We’re going to dissect the market environment, spot the inside bar, and walk through the trade from entry to exit. This is how you start connecting the dots between an idea and actually executing it under pressure.
Bullish Breakout on EUR/USD Daily Chart
This first example is a textbook trend-continuation trade. The market has already shown its hand—we’re in a clear uptrend with price carving out higher highs and higher lows. This is exactly the kind of environment where you want to be looking for a high-probability breakout.
- Market Context: The EUR/USD is in a strong bullish phase, bouncing cleanly off a key demand zone. It’s pretty clear the buyers are in control.
- The Setup: A large, bullish mother bar forms, followed by a much smaller inside bar. This is a classic sign of a market taking a quick breather, digesting recent gains before its next potential push higher.
- The Trade Plan: Place a buy-stop order just a few pips above the high of the mother bar. The stop-loss goes just below the mother bar’s low to clearly define the risk. For a target, we’re aiming for the next major resistance level, making sure we have at least a 1:2 risk-to-reward ratio.
- Outcome: The next day, price pushes up and breaks the mother bar’s high, triggering our long entry. The bullish momentum picks back up, and the trade sails to its profit target. A clean win.
This setup worked so well because it was perfectly in sync with the dominant market flow. A quick historical check shows this isn't a fluke. On the EUR/USD daily chart, I've found this pattern continues the trend about 65% of the time, with the breakout usually happening within 1-3 days.
Failed Bearish Reversal on Gold (XAU/USD)
Now, let's break down a trade where the pattern fell flat. These are the trades that forge a trader’s discipline, as they almost always reveal a misread of the market or a missing piece of confluence.
A failed pattern doesn't mean the strategy is flawed; it means the specific conditions for a high-probability trade were not fully met. Analyzing these instances is essential for refining your trading edge.
In this case, Gold had been rallying hard and was coming up against a significant resistance level. A bearish inside bar popped up, tempting traders to call a top.
- Market Context: Price is in a powerful uptrend but is now testing a major supply zone where sellers have shown up in force before.
- The Setup: A bearish inside bar appears right at this resistance, signaling that the buyers might be running out of steam. This looks like a prime shorting opportunity to many.
- The Trade Plan: A sell-stop order is placed below the mother bar’s low, with a stop-loss tucked safely above its high. The profit target is the next support level down.
- Outcome: Price does break below the mother bar, triggering the short entry. But the victory is short-lived. The bullish momentum was just too strong, and price quickly reverses, roaring back up through the resistance and stopping the trade out for a loss.
Why did it fail? Simple: we tried to fight a freight train. That bearish inside bar was just a momentary pause, not a full-blown reversal signal. This is a perfect illustration of why it’s so critical to wait for multiple confirmation signals before trying to counter-trend a strong market.
When you're building your own library of chart examples like these for study, it helps to find a way to automate web page screenshot capture to make the analysis process much more efficient.
Common Mistakes to Avoid When Trading This Pattern
Knowing what not to do is just as important as mastering any trading strategy. The inside bar is a fantastic tool, but it's not foolproof, and it’s certainly not immune to misinterpretation. I’ve seen countless traders, eager to jump on what looks like a perfect signal, fall into the same predictable traps that can quickly bleed an account.
Understanding these common errors is your first line of defense. By recognizing the pitfalls before you're in a trade, you can build a more disciplined and resilient approach. The goal here is to trade the pattern with precision, not just blind optimism. Let's break down the most frequent mistakes I see and, more importantly, how to fix them.
Trading Every Inside Bar You See
This is, without a doubt, the single biggest mistake traders make. They treat every single inside bar as a high-probability trade signal. But let me be clear: not all patterns are created equal. An inside bar that forms in the middle of a choppy, directionless market is just market noise. It’s not a coiled spring of energy waiting to explode.
The fix is simple but requires discipline: prioritize context over the pattern itself. Only take trades where the inside bar aligns with the broader market structure.
- In a strong trend: Look for inside bars as continuation signals after a pullback to a logical area.
- At key levels: Pay extremely close attention when an inside bar forms right at a major supply or demand zone, or a significant support and resistance level.
This filtering process will dramatically increase your odds. You’re no longer just trading a pattern; you’re trading a pattern that has a powerful technical reason to work.
Here's a rule to burn into your memory: The location of the inside bar on the chart is far more important than the appearance of the pattern itself. Context is everything.
Setting Your Stop-Loss Too Tight
The inside bar pattern gives you a very logical place for your stop-loss: just on the other side of the mother bar. It’s a gift. Yet, in an effort to squeeze risk down to nothing, some traders will place their stops inside the mother bar's range or just a few pips away from their entry. This is a recipe for getting stopped out by random market noise.
This mistake almost always comes from trading a position size that is too large for the account. Instead of tightening your stop to an unsafe level, the correct move is to reduce your position size. This allows you to place your stop-loss correctly—just beyond the mother bar's high for a short or below its low for a long—and give the trade the room it needs to breathe without being knocked out by normal price fluctuations.
Falling for False Breakouts
A false breakout, or "fakeout," is another classic trap. This is when the price breaks the high or low of the mother bar, triggers your entry, only to whip back around and slam into your stop-loss. This is often the dirty work of institutional traders hunting for liquidity—your stop orders.
To combat this, wait for confirmation. Instead of placing a pending stop order that gets triggered automatically on a touch, wait for a candle to actually close beyond the mother bar's range. Yes, this might mean you get a slightly less favorable entry price, but it confirms there’s real momentum behind the move. This simple act of patience will save you from countless frustrating losses and is one of the hallmarks of a professional approach.
Common Questions About Trading the Inside Bar
Even after you understand the basics of the inside bar, some practical questions always pop up when you're staring at a live chart. Let's tackle the most common ones I hear from traders. My goal here is to clear up any confusion so you can trade these setups with more confidence.
Think of this as moving from the textbook to the trading floor. We're covering the nuances that make all the difference.
What Is the Best Timeframe for Trading Inside Bars?
You'll see inside bars on every timeframe, but they carry the most weight on the higher timeframes like the daily or 4-hour charts. Why? Because these longer periods cut through a ton of market noise, giving you cleaner signals and more reliable consolidation patterns.
An inside bar on a daily chart represents a full 24 hours of indecision. That's a significant pause in the market and tells a much bigger story than a similar pattern on a 5-minute chart. Shorter timeframes are notorious for "fakeouts" and whipsaws, which can be incredibly frustrating if you're just starting out. Stick to the daily chart to get your bearings.
Pro Tip: Master the inside bar on the daily chart first. Once you're consistently profitable there, you can start exploring the H4 chart, but always remember you're dealing with more noise.
Does the Color of the Inside Bar Matter?
Honestly, in most situations, the color of the inside bar itself—whether it's bullish or bearish—is not the most critical piece of the puzzle. The pattern's main job is to signal a pause, a tightening of volatility. Whether the bar closes up a few pips or down a few pips doesn't change that core message.
What truly matters is the context. Imagine a massive bullish mother bar charging up in a strong uptrend, followed by a tiny inside bar. Even if that little inside bar is red (bearish), the overall signal is still powerfully bullish. Your focus should always be on the location of the pattern and the dominant trend, not the candle's color.
Can There Be More Than One Inside Bar?
Yes, and when you see this, you need to pay very close attention. A setup with two, three, or even more inside bars all contained within the original mother bar is called a multiple inside bar pattern. Some traders call it a "coiling" pattern.
This is a sign of an extreme squeeze in the trading range and a major drop in volatility. Picture a spring being compressed tighter and tighter. These setups often lead to the most explosive breakouts because all that pent-up energy finally has to be released.
Ready to stop relying on confusing indicators and start reading the market like a professional? Colibri Trader provides a clear, price-action based approach to help you achieve consistent results. Discover your trading potential today at https://www.colibritrader.com.