


Trading the Gravestone Doji Candle A Price Action Guide
When a strong uptrend starts to look tired, the gravestone doji is one of the clearest signals that the bears might be waking up. It's a powerful bearish reversal pattern that tells a story of a failed rally.
Visually, it looks like an inverted "T," where the open, low, and close prices are all crammed together at the bottom of the candle. This formation shows us a fierce, single-session battle where the sellers land the final blow.
Unpacking the Gravestone Doji Candle

To really get what this candle means, let’s walk through the session. The day starts, and the bulls are completely in charge. They're feeling confident, pushing prices way up and leaving a long upper shadow (or wick) in their wake. Everything looks great for the buyers.
But then, something shifts. At the very peak of the rally, sellers storm the market. They don’t just show up; they show up with overwhelming force, rejecting those higher prices aggressively.
This wave of selling is so intense that it shoves the price all the way back down to where it started. By the time the session closes, the buyers have nothing to show for their efforts. All their hard work was erased in a few short hours.
The result? A candle with almost no body, screaming that the bullish momentum just hit a brick wall. This is why the gravestone doji candle is such a critical warning for any trader holding a long position—it suggests the tide is about to turn.
Key Features at a Glance
So, how do you spot one in the wild? There are a few key things to look for. The gravestone is just one member of a larger family of patterns; you can get the full picture in our guide on what is a doji candle to sharpen your skills.
Core Insight: The gravestone doji is more than just a shape on a chart. It’s the footprint left behind by a dramatic power shift, capturing the exact moment bullish conviction dies and bearish pressure takes the wheel.
Here’s a quick breakdown to help you identify the gravestone doji at a glance.
Gravestone Doji At a Glance
This little table unpacks the visual cues and the market psychology behind them. It makes spotting the pattern quick and simple.
| Characteristic | What It Looks Like | What It Means |
|---|---|---|
| Upper Shadow | A very long wick stretching skyward. | Buyers tried to push the price up, but failed. |
| Candle Body | A flat line, or extremely thin. | The open, low, and close are virtually the same. |
| Lower Shadow | Tiny or non-existent. | The low for the session was also the open and close. |
| Location | Appears after a solid uptrend. | Bullish exhaustion is setting in; reversal is likely. |
Seeing these characteristics line up after a strong run-up should immediately get your attention. It's a clear sign to start reassessing your bullish bias.
The Market Psychology Behind the Gravestone Doji
If you want to really get what a gravestone doji is telling you, you have to stop seeing it as just a shape on a chart. Instead, think of it as the condensed story of a brutal, single-day battle in the market. It’s a powerful narrative where the bulls start out charging, only to be completely annihilated by the close.
The trading session kicks off with the buyers firmly in the driver's seat. They’re feeling good, probably riding the momentum of an ongoing uptrend, and they aggressively push the price higher and higher. This initial buying pressure is what carves out the long upper wick (or shadow)—a visual testament to their early confidence. At this stage of the fight, everything looks rosy.
The Turning Point
Then, seemingly out of nowhere, the rally slams into a brick wall. Right at the peak of the session, a flood of sellers enters the market. This isn't just a few traders taking profits; it's a decisive, aggressive rejection of those new highs. These sellers see the price as way too expensive and start dumping their positions with enough force to absorb every last buy order.
This wave of selling is so intense that it completely unwinds all the progress the buyers made earlier in the day. The price gets shoved all the way back down to where it started. By the time the session closes, the buyers are left with nothing to show for their efforts. Total defeat.
The Gravestone's Message: This candle is a giant footprint showing us that the bulls have completely run out of gas. It tells a story of a failed attempt to push prices higher, an attempt that was violently shut down by a surge of selling pressure at a key level.
From Optimism to Fear
What the gravestone doji really captures is a lightning-fast psychological shift from greed to fear. That long upper wick? That's the bulls' final, desperate gasp for air in a tired uptrend. The fact that the price closed right back where it opened signifies a complete and utter loss of control for the buyers.
This battle tells us three crucial things:
- The bulls are exhausted. They simply don't have the firepower to sustain higher prices anymore.
- The bears are awake and strong. They've successfully defended their territory and are now on the offensive.
- Indecision has turned into outright rejection. The market tested a higher price zone and was emphatically told "No."
At the end of the day, the psychology behind the gravestone doji is that of a failed auction. The market tried to find buyers at higher prices and failed spectacularly. This failure serves as a stark warning sign that the prevailing uptrend is in serious trouble and the bears are gearing up to take over.
How to Identify a Valid Gravestone Doji in Any Market
Spotting what looks like a gravestone doji is the easy part. The real skill is knowing if it's a genuine, high-probability signal or just market noise. The secret? It's all about context. This pattern means the most when it shows up after a strong, sustained uptrend, often acting as the final gasp of a bull run.
To do this right, you need a mental checklist. Think of it as your filter for weeding out the weak signals and honing in on the ones that really matter. The best gravestone dojis—the ones that scream "reversal"—all share a few critical traits that tell the story of a major power shift between buyers and sellers.
The Anatomy of a High-Probability Signal
A textbook gravestone doji has three distinct parts. If any of these are missing, the signal just isn't as strong. Each element paints a picture of a rally that failed spectacularly.
- A Long Upper Shadow: This wick needs to be long and obvious. It’s the visual proof that bulls gave it their all, pushing prices way up during the session.
- Virtually No Body: The open, low, and closing prices should all be crunched together at the very bottom of the candle. This creates a flat line or an extremely thin body.
- No Lower Shadow: A clean gravestone has little to no shadow sticking out below the body. This tells you the session’s lowest point was right where the price opened and closed.
When you see these three things line up at the top of a trend, the message is powerful: the bulls ran headfirst into a brick wall of sellers. It’s a huge visual clue that the path of least resistance is about to flip to the downside. Of course, to even spot these patterns, you have to be comfortable reading charts. If you're just starting out, it's essential to master candlesticks first—that's your foundation.
Using Volume as a Confirmation Tool
Beyond the candle's shape, one of the most powerful confirmation tools you have is volume. A gravestone doji that forms on high volume is infinitely more significant. It’s the market’s way of telling you that a lot of traders were involved in that battle at the peak.
That high participation means the rejection of higher prices wasn't a fluke. It was a decisive, bloody fight backed by a ton of selling pressure. On the flip side, a gravestone doji on low volume? It's far less convincing and could just be a temporary breather before the trend continues.
Key Takeaway: A Gravestone Doji on high volume confirms the rejection of higher prices was a major market event, not just random chatter. It’s the proof that the failed rally had widespread participation from big players.
The gravestone doji is a powerful pattern precisely because it’s rare. Its scarcity makes traders sit up and pay attention. In a massive study of over 2.2 million candlesticks on the S&P 500, similar bearish doji patterns showed up less than 0.50% of the time. That rarity is exactly why they're worth watching.
This chart breaks down the simple psychology behind how a gravestone doji comes to life.
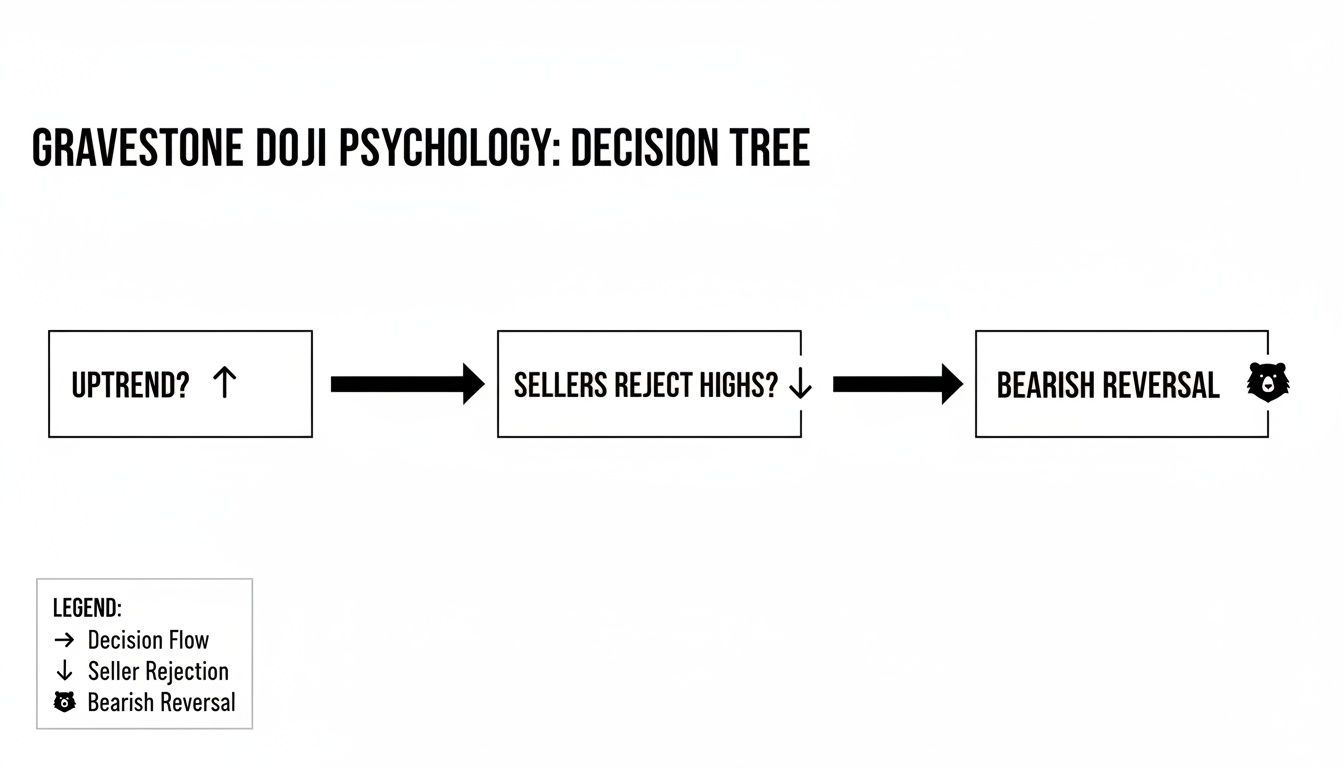
As you can see, the pattern only becomes meaningful when a solid uptrend is slammed by a sudden and fierce seller rejection, pointing to a potential reversal.
A Price Action Strategy for Trading the Gravestone Doji

Spotting a gravestone doji is one thing, but actually making money from it? That’s a whole different game. To turn this powerful signal into a profitable trade, you need a repeatable strategy rooted in solid price action. A clear plan gets rid of the guesswork and gives you the discipline to only pull the trigger on the best setups.
Let me be clear on the single most important rule: never, ever trade the gravestone doji in isolation. Jumping in the moment you see the candle form is a classic rookie mistake. Think of this pattern as a warning sign, a yellow light—not a guaranteed reversal. Your real edge comes from waiting patiently for the market to show its hand.
The Confirmation Candle Rule
Confirmation is your green light. It’s the market’s way of nodding in agreement with the gravestone’s bearish story. Without it, you're not trading, you're just gambling on a possibility.
The strongest confirmation you can get is when the very next candle closes decisively below the low of the gravestone doji. This action proves that sellers have wrestled control from the buyers and are now actively shoving the price down. If the next candle is weak, sideways, or even bullish, it completely invalidates the signal. Move on.
Trading Principle: The gravestone doji tells you the bulls have been stopped cold. The bearish confirmation candle tells you the bears have taken over the field. You need both before you even think about placing a trade.
The Entry Trigger
Once you have that confirmation, your entry becomes much clearer. The goal is simple: enter a short position after the market has confirmed the shift in power. Here’s a simple, effective trigger I use:
- Find a valid gravestone doji at the top of a clear uptrend.
- Wait for the next candle to fully form and close. Don't rush it.
- Confirm the bearish signal: Did that candle close below the gravestone's low?
- Enter the trade: Place your sell order near the close of this confirmation candle. Sometimes, you can get a slightly better price on a small pullback toward the doji’s low.
This patient approach is your filter. It weeds out the false signals where the market just pauses for a breath before continuing its charge higher. To really get a handle on this style of trading, you should check out our guide on how to trade with price action to build up your core skills.
Risk Management and Profit Targets
A trading idea without a plan for risk and profit is just a wish. These two pieces are what separate traders who last from those who blow up their accounts.
Stop-Loss Placement:
Your stop-loss is your emergency exit. The most logical place for it is just a few pips above the high of the gravestone doji’s long upper shadow. Why? Because if the price breaks above that peak, the entire bearish idea is proven wrong. You want to get out immediately with a small, planned loss.
Profit-Taking Strategy:
Your take-profit level should be based on what the chart is telling you. Look to the left. Where is the nearest significant support level? This might be a previous swing low, a zone where price consolidated, or an area of clear demand. By setting your target there, you aim to get out of the trade just before a new wave of buyers is likely to step in and push the price back up.
To make this crystal clear, here’s a simple checklist you can follow for every gravestone doji setup.
Gravestone Doji Trading Rules
| Step | Action Required | Purpose |
|---|---|---|
| 1 | Identify a valid Gravestone Doji in a clear uptrend. | Ensures the pattern appears in the correct market context for a reversal. |
| 2 | Wait for the next candle (the confirmation candle) to close. | Avoids premature entries and filters out false signals. |
| 3 | Confirm the candle closed below the low of the Gravestone Doji. | Verifies that sellers have taken control and momentum has shifted. |
| 4 | Enter a short (sell) position near the confirmation candle's close. | Provides a clear, rule-based entry point once the signal is validated. |
| 5 | Place your stop-loss just above the high of the Gravestone Doji's shadow. | Defines your maximum risk and invalidates the trade setup if breached. |
| 6 | Set your take-profit at the next major support level. | Aims for a realistic profit target based on market structure. |
This table isn't just a set of rules; it's a discipline framework. Following these steps methodically will help you build consistency and trade the pattern with confidence, rather than emotion.
Common Mistakes to Avoid When Trading This Pattern
Knowing a trading strategy is only half the battle. Honestly, understanding what not to do is probably just as important.
The gravestone doji can be an incredibly powerful signal, but it’s also surrounded by traps that catch new or undisciplined traders. Learning to spot and sidestep these common errors is what separates consistent results from a string of costly lessons.
One of the biggest mistakes I see is traders trying to force this pattern in a sideways, choppy market. A gravestone doji loses almost all its meaning without a clear preceding uptrend. In a range-bound market, these candles pop up all the time and just signify indecision, not an impending reversal.
Crucial Rule: The gravestone doji is a bearish reversal pattern. For something to reverse, it must first be moving in a clear direction. Without an uptrend, there is nothing to reverse.
Another major pitfall is ignoring the bigger picture. A single candle, no matter how perfect it looks, doesn't operate in a vacuum. Think about it: a gravestone doji appearing at a minor resistance level in a raging bull market is far more likely to get run over than one forming at a major historical resistance zone. Always zoom out and see what the higher timeframes are telling you before you act.
Acting Without Confirmation
This one is huge. Perhaps the most frequent and costly error is jumping into a trade the moment a gravestone doji closes. This is pure impatience, and the market loves to punish it.
The candle itself is just a warning shot—a sign that the bulls are getting tired. It is not a guaranteed sell signal.
The market can easily pause, print a doji, and then continue its upward march, stopping out all the early sellers. You need to wait for the next candle to close below the doji’s low. That's your proof that sellers have actually wrestled control away from the buyers. Without this confirmation, you're just gambling.
Poor Risk Management Practices
Finally, even a perfect setup can turn into a painful loss if your risk management is sloppy. Two issues seem to plague traders trying to use this pattern:
- Setting the stop-loss too tight: Placing your stop just a few ticks above the doji’s high makes you a sitting duck for normal market noise. A minor price spike could easily take you out of a perfectly good trade right before it moves in your favor. You have to give the trade a little room to breathe. I always set my stop a bit above the high.
- Ignoring the risk-to-reward ratio: Before you even think about entering, you must know if the potential profit is worth the risk. If the nearest support level (your likely target) is too close to your entry, the trade just isn't worth taking. A poor risk-to-reward setup is a losing game over the long run, period.
Mastering this pattern means developing the discipline to sidestep these traps. A lot of traders find that keeping a journal of their trades highlights these recurring problems. To learn more about this, our guide on the top trading mistakes to avoid offers deeper insights into building better habits.
By focusing only on high-quality setups and executing with patience, you can make the gravestone doji candle a truly effective tool in your trading arsenal.
A Few Final Questions on the Gravestone Doji
Let's wrap things up. To make sure you’ve got a solid handle on this pattern, I want to go over a few of the most common questions I hear from other traders. This should clear up any lingering confusion about using the gravestone doji in the real world.
What's the Difference Between a Gravestone Doji and a Shooting Star?
This is an excellent question. You’re right to notice they look almost identical, and they both scream "potential bearish reversal." The entire difference comes down to the size of the candle’s body.
A pure gravestone doji candle has almost no real body. The open, low, and close are all piled up at the exact same price, giving you that perfect inverted “T.” It’s a crystal-clear picture of sellers completely slamming the door on every single gain the buyers tried to make.
A shooting star, however, has a small body down at the bottom. The story it tells is nearly the same—buyers tried to rally, failed, and got shoved back down. But that tiny body shows they held on to a sliver of ground. The gravestone doji is just a little more ruthless, showing a total rejection of higher prices.
Key Distinction: Think of it like a battle. A shooting star means the buyers lost the fight. A gravestone doji means they were annihilated, driven back to the exact spot where they started.
Just How Reliable Is the Gravestone Doji Pattern?
I’ll be blunt: the gravestone doji is not a magic bullet. Anyone who tells you a single candle pattern works every time is selling you something. Its reliability depends entirely on two things: context and confirmation.
A lone gravestone doji popping up in the middle of a messy, sideways market is just noise. It doesn't mean anything because the market is already directionless and full of indecision.
But when it appears in the right place? That’s when you need to pay attention. Its reliability shoots way up when you see it:
- At the peak of a long, sustained uptrend where buyers are probably getting tired.
- Right at a major resistance level that has rejected price before.
- On a spike in trading volume, showing a lot of participants were involved in the fight.
Even then, the real key is waiting for confirmation. A strong bearish candle closing below the doji’s low is your green light. That's what separates guessing from professional trading. Patient traders see the doji as a clue, not an immediate signal to jump in.
Can a Gravestone Doji Show Up in a Downtrend?
Absolutely, but its meaning flips completely. If you spot a gravestone doji during a downtrend, it is not a bearish reversal signal. Don’t make the mistake of shorting it.
In this scenario, it still shows indecision. The long upper wick tells you that buyers gave it a shot—they tried to rally the price—but the sellers were just too strong and crushed them, pushing the price right back down to where it opened.
So, instead of signaling a new move down, it simply confirms the power of the existing downtrend. It shows sellers are still firmly in charge. While it’s interesting information, it’s not a high-probability trade setup. For the gravestone doji to be a powerful, actionable signal, it needs to appear at the top of an uptrend, warning that the bulls are exhausted and the bears are about to take over.
Ready to stop guessing and start trading with a clear, repeatable strategy? At Colibri Trader, we teach a straightforward price-action approach that helps you read the market with confidence. Transform your trading performance and achieve consistent results by visiting us at https://www.colibritrader.com.